Today we will see how pipeline construction is carried out. read complete article for valuable information.
We all know that water or fluid are supplied from one location to the another location using pipeline networks.So we will see in detail how pipeline construction is carried out.
After designing the pipelines required to supply water to the public for various purposes, the process of pipeline construction for water distribution is known as “Laying of pipe lines”.
Pipelines are usually laid underground But it can also be laid on the ground when the pipeline passing through an open area is not obstructing anyone and there is no possibility of any damage to the pipeline.
Procedure for laying of pipes :
pipeline construction is done in the following different stages:
1) Preparation of Detailed map
2) Setting out the center line Excavation of trenches
3) Laying and connecting pipes
4) Lowering and jointing of pipes
5) Testing for leakage and pressure
6) Back filling & cleaning of site
7)Testing of pipeline
1) Preparation of detailed map:
After conducting an engineering survey of the pipeline, as per its detailed proposal, a map showing the space or area through which the pipeline is to pass may be prepared along the roads, streets and lanes etc.

The proposed pipeline is shown on this map along with its size (length, diameter, etc.). In addition to this, other details like existing pipelines, sewer lines and telephone lines in the area are also shown on this map. In addition to these details, things like valves, stand posts applicable to the proposed pipeline are also marked so that the work can be done easily without any difficulty when the execution of the pipeline is carried out.

2) Setting out the center line:
After preparing a detailed map for the pipeline plan, the center line of the pipeline is printed on the actual locations. Pegs or stakes are placed every 30 meters to mark the center line. This distance is kept from 5 m to 15 m in the diagram of the pipeline where curvatures occur. Where roads or streets have curbs, the centre line of the pipe is measured from the curb.
 |
| Site Cleaning |
 |
| Making Center Line of Pipe |
3) Excavation of trenches:
After the center line of the pipeline is marked on the ground, digging of trenches is started. The width of the trench is usually 30 cm to 45 cm or more than the diameter of the pipe. The width of the trench is about 15 to 30 cm more than pipe diameter where joints are comes.

The trench is dug in such a way that the both ends of pipe hang freely while the rest of the pipe touches the bottom of the trench.
The pipe is usually kept at a depth of about 90 cm below the ground level so that the pipes do not break due to heavy traffic above it.
Timbering to the trench should be provided on both sides of the trench if the pipe is to be dug deep in soft or slippery soil.
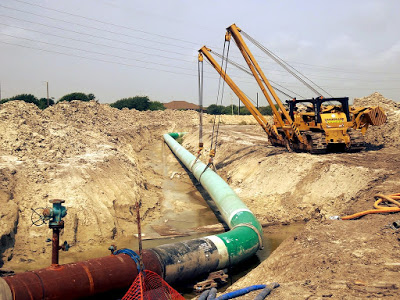
4) Lowering and jointing of pipes:
After the excavation of the trench is completed, the laying of pipes is started. There are usually two things to keep in mind when laying pipes and connecting them. On the one hand, the pipes are placed on the opposite side of the trench to make the work easier.

And work is started from its lower level. In which the pipes should be connected in such a way that the socketed end of the pipe is facing towards the higher side. As well as aligning the pipe, jointing is also done.


5) Testing for leakage and pressure:
Pipes are tested in a standardized manner for leakage and pressure after they are lowered and aligned.

6) Back filling and site cleaning:
After proper testing of pipes is completed, backfilling is done by the soil removed during excavation. When filling the trench, the soil is carefully filled by pressing the soil on the rotating side of the pipe, after filling the trench, the surplus soil is removed and the site is cleaned.

Specification for laying of pipes
(1) Unloading of Pipes:
Two men should be used for unloading pipes weighing up to 60 kg when mechanical equipment is unavailable for unloading pipes from transport equipment.
Heavy pipes from trucks or wagons should be tied with ropes and then slides off the planks with a slope of no more than 45.

Only one pipe should be lowered at a time. Under no circumstances should the pipe be thrown down from the carrier and should not be pulled or rolled in such a way as to rub against a hard surface.
(2) Storage of pipes:
Handling and storage should be done very carefully to prevent damage to pipes and their fittings.
The pipes should be arranged in a row on one side of the trench parallel to the midline of the trench. The socketed ends of the pipes held in this way should be kept towards the upstream side of the flow.
Pipes of the same type and diameter should be stacked.
(3) Cutting of the pipe:
When a pipe is to be cut to a certain length, a line should be drawn with a chalk on the side of the pipe at the place where it is to be cut.

This line should be marked in such a way that it is perpendicular to the mid line of the pipe.
The pipe should be held firmly on two parallel wooden rafters nailed with cross beams in such a way that the marking of the part to be cut is between these two beams.
The pipe should be cut very precisely from the spot marked with the help of a carpenter’s saw or a long bladed hex.
Cutting the pipe should be avoided as long as possible by keeping the end part hanging, as the weight of this hanging end is likely to cause the pipe to be cut before it is fully cut.
(4) Excavation of trenches:
Excavation of trenches should be done in such a way that the pipe stays in its fixed alignment and at a certain depth.
If the soil at the bottom of the trench is soft or has a made up bottom, the soil should be well soaked and rammed and if there are any depressions in the bottom of the trench, it should be filled in layers with a thickness of 20 cm with sand.
When the bottom of the trench is extremely hard or rocky or gravelly, the trench should be excavated at least 15 cm below its designed grade, followed by stone, gravel or sand.
The trench should be filled to its required grade (Fine moorum can be used instead if fine soil or sand is not available nearby).
A flat surface should be prepared by compacting the clay thus filled. If blasting is required to dig a trench in any case, it should be removed to a safe place if there are pipes or other damaged material around the blasting site as well as already covered pipeline near the site to prevent damage to such material due to blasting.
After digging the trench, instead of inserting sockets in the pipe, cavities are prepared. This excavation is done in such a way that there is enough space at the bottom of the pipe to connect the pipe joints and the rest of the pipe can be adjacent to the bottom of the trench.
Once the pipe is connected, these socket holes or hollows should be filled with sand. Necessary timbering work should be done during excavation and if water enters the trench, the trench should be dug by proper dewatering.
(5) Laying of pipes:
Pully block, shear legs, chains are suitable for laying pipes in the trench. Ropes as well as other erection equipments should be used. Never push the pipe into the ditch by rolling or dropping.
One end of each rope should be tied to an iron or wooden peg dug into the ground and the other end should be held in a man’s hand and the pipe should be lowered slowly.
The trench pipes should be arranged in such a way that the spigot of one pipe is exactly centered in the socket of the other pipe and then it should be pushed carefully and fitted to the full depth.
Pipeline should be laid with proper connection of pipes and at proper level. Each pipe should be fairly flat so that it touches the bottom of the trench.
Soils with a texture similar to black cotton soil, when saturated or dry, tend to soften or crack, respectively.
An sand layer of at least 10 cm thickness should be made on the rotating side of the pipe in the trench of pipes passing through such clay area.
Formation of thrust blocks to protect the structure of the pipe against hydraulic thrust in front of each section where the direction or size of the pipeline changes or where the dead ends occur.
(6) Backfilling of trenches:
Backfilling must be required to prevent damage from falling stones in the trench or movement in the position of the pipe in the open trench.
In addition to this, in case of flood or discharge of water in the open trench, the work of filling the trench should be done immediately to avoid the possibility of lifting the pipeline.
The soil around the pipe as well as the bottom should be packed by crushing and grooving so that the pipeline has a uniform and continuous support.
The tamping bar should be used for tamping the soil and water should be used to fill the trench soil evenly.
The clay used in filling the trench should not initially contain lumps or stones. When filling the soil, it should be filled with proper consolidation in layers about 10 cm thick without filling it all at once and the soil should be pounded till a cushion of about 30 cm is formed on the pipe.
Normally after the entire trench is filled, about 10 cm more soil should be raised from the surface of the trench and it should be compacted properly. By doing so the soil inside the trench becomes natural. Excess clay from the top is properly incorporated into the trench.
(7) Hydrostatic Test:
After construction of any new pipeline, its proper connection and after completion of trench refilling, the following tests are performed:
(i) Double the working pressure at which the pipe water is to be carried or The pipe is tested by applying high pressure.
Each joint must prove to be completely hydrated during the effect of this pressure.
(ii) After completion of pressure test, leakage test is done for a period of at least two hours with the pressure as prescribed by the local authority.

Hydrostatic testing of each section of about 500 m length is usually done during the ongoing work of the pipeline. By doing this test, if there is any error in the workmanship during the ongoing work, rectification can be done immediately at low cost.
(8) Leakage test:

Water is filled in the section to be tested to find out how much water is leaking from the newly laid pipeline. And care is taken that no air remains anywhere in the entire section. After observation for about two hours, water leakage is calculated using the following formula:
Q=ND √P/3.3
Where,
Q = Allowable leakage Cm3 / hr
N = Number of joints in the section
P = Average test pressure kg / cm2
D = Dia. Of pipe in mm
I Hope You Like Our Article “Pipeline Construction : 7 Steps Process From Beginning To Advance” Don’t be Cheap To Share This Article with your Friends.
+ READ MORE
- Innovation in Civil Engineering “solar roadway”
- How to solve any structural beam in smartphone within 2 minute ?
- What is Admixture ? 15 types of admixtures in concrete and Their Affects- Civil Engineering Must Know
- How bricks are made – materials,manufacturing of bricks,moulding of bricks,burning of brick
- Classification of Aggregates Used In Construction Work || Civil Engineer Must Know ||